
For any multisig wallet, a Coldcard must be initialized before it is able to sign a transaction. This means importing information about how the multisig wallet was constructed, so that the Coldcard has context for what it may be asked to sign.
Importing the information is done using a Coldcard configuration file.
What you’ll need:
- A PC or Mac with an SD card reader, signed in to your Unchained account
- Your Coldcard with its power cord and SD card
- A live vault or loan created using a Coldcard key
How to find your Coldcard configuration file:
- Vaults: Click Register devices from the Vault tools section or from the banner at the top of your screen.

Loans: Click Register devices from the loan page menu.
- Select Coldcard and click Next.
- Download the Coldcard config file, then load that file onto your Coldcard.
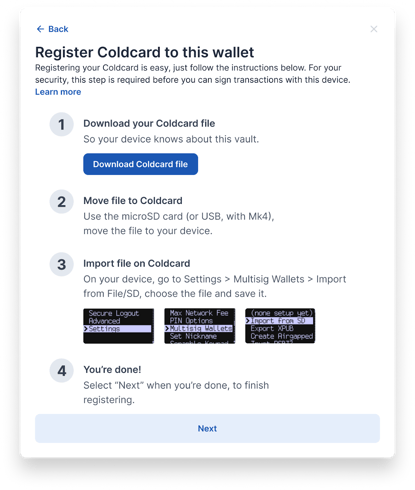
How to import the file into your Coldcard
- Move the Coldcard configuration file from your downloads folder onto a microSD card (or directly to your connected Mk4).
- Remove the microSD card from the computer and plug it into your Coldcard.
- On your Coldcard home screen, select Settings, then Multisig Wallets.
- Select Import from SD or Import from File.
- The Coldcard will find the file. Select OK (the checkmark button), then select the file.
- For the the prompt "Create new multisig wallet?" click OK.
- Review the multisig wallet and select OK.
- Once it says saved, you can hit OK, to be taken back to the Multisig Wallets menu, with one line displaying "2/3: [your vault or loan ID]".
Now your Coldcard can sign partially signed bitcoin transactions (PSBTs) produced by the vault or loan! You may delete the file from your microSD card and disconnect your Coldcard. Check out our in-depth walkthrough for more details on setting up an Unchained vault using Coldcards.