
Business accounts provide the best multisig solution for businesses looking to secure bitcoin with the flexibility of adding partners.
Note: We only service accounts with a U.S. address. We do not allow creation of international accounts at this time.
We have separate guides for setting up different accounts:
Register your email and select your account type:
- Navigate to my.unchained.com and click Sign up.
- Enter your email address and verify the code sent to your email.
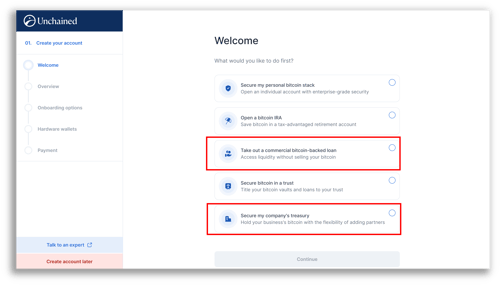
- Choose your intention for the account. To create a business vault, choose Secure my company's treasury.
- If you intend to only apply for a commercial loan with us, select Take out a commercial bitcoin-backed loan.
- If you intend to only apply for a commercial loan with us, select Take out a commercial bitcoin-backed loan.
- Select an onboarding option: Self-Setup, Concierge Onboarding, or Unchained Signature which is our best plan.
- Select if you need hardware wallets. All Unchained vaults require two hardware wallets. You may bring your own or purchase from us.

- Add a payment method and check out.
- Complete your basic profile. You will need to provide us with your personal information. and your business information.
- Review the provided information and Submit to complete your basic profile.
- If your basic profile is not approved immediately, it may take up to two business days for our team to review the application.
- Once approved, provide your business's information:
- Name: Enter the name of your business entity, e.g., "[Your Business Name]."
- Legal Business Name: Enter the full legal name of your business. Note: Please do not include any special characters in your entity’s legal name. The entry should consist of text only.
- Purpose: Describe the purpose of your entity.
- Business type: Select the option that best describes your business from the dropdown. If none of the options represent your business, select Other and specify.
- Incorporation: Enter the location and date where your company was incorporated.
- Fill out the Business Address form.
- Enter the EIN/Tax ID of your business.
- Organization date: Supporting documents need to reflect this legal organization date.
- State of Organization: Supporting documents need to reflect this organization's state.
- Registered address: Your registered address is the official address used for legal correspondence. This address should be in the state where you formed the business.
- Upload your business documents via the Incorporation Documents form. See our Knowledge Base article for more information related to supporting documents.
- Principals: Please provide all individuals (no entities) who ultimately own 20% or greater equity interest. Up to five principals may be beneficial owners. Follow the prompts and fill out the required information for each principal.
- Each owner will be added to the member invite list. If these owners do not need access to the online account, you can remove them. At this step, you can also invite other users to your org who are non-owners. Note: you can do this later as well in your business settings.
- Add your business partners to your Unchained Business account by typing in their emails separated by a space. Note: You can skip this step if you are the only member.
- Verify that the information displayed is correct and click Submit.
- Review the submitted information to verify it is accurate and select Submit.
- Once your business profile is approved, you can add keys to your account and create your business vault or apply for commercial loans.
- Recommended: Enable multi-factor authentication (MFA) for increased account security.